Saturday, June 23, 2012

Off the List!!

I love days when I check lots of stuff off my 'to do' list.  I don't mean laundry and grocery shopping, I mean art stuff.  This weekend I've managed to get several projects that have been on that list done, and on their way to new owners!

I already posted my Green piece, the last challenge for the Tangled Textiles group.  I was happy with it, but wanted to add a little hand embroidery.  And then I decided it would have more presence if it were mounted on a stretched canvas.  The 16 X 16 size fits perfectly on a 20" canvas, so I bought several.  I got acrylic paints, and messed around mixing colors that I thought would compliment the fiberart.  I was really happy with the end result!


I did not want a solid paint color, but something more like my hand dyes.  I did an undercoat of dark green, then painted yellow and brown on top, purposely letting the green color show through in some areas.  I love the effect this gives, and how well it frames the quilt.  It is now on its way to my son in Chicago, a present for his 30th birthday.

The hand embroidery turned out to be pretty subtle.


It follows along the pathway I quilted, kind of like the greenery that borders our walking trails.

I got the ugly green-orange fabric from last week overdyed in turquoise.


They came out fairly different.  The one on the left has much larger patterning, and more turquoise showing.  Both remind me of underwater imagery.  And, I am much happier with them now!

And this quilt is done!  I got it trimmed, bound, sewed on a sleeve, and got it labeled.  I am so happy to have this one completed.


I learned a lot of lessons with this one.  I'm happy with the effects I got with the Shiva paintstiks, that part of the quilt finally has the emphasis I wanted.


I thought about making the outside edge curvy, to mimic the curves of the hand dyed fabric.  Turns out I didn't like it, so the only curves are on the corners.  I did cut back the black a fair amount.  This one will be delivered to its new owner tomorrow!

I think tomorrow will be a day of rest.  After church, we have tickets for a minor league ball game.  I just hope they aren't on the side of the stadium facing west!!

Wednesday, June 20, 2012

Weekend Dyefest

I'm finding it harder to blog on weekends, because I'm spending more time in the studio creating.  That's what the studio is for, right?  Last weekend I decided it was high time I used up some dye solutions I've had in the studio frig for a few months.  I also decided I wasn't going to mess around with fat quarters- I dyed half-yard pieces or larger.  I need to start making a dent in the 75 yards of PFD I bought last year when the price of cotton started rising.

I had no plan, no idea of what colors I'd end up doing.  I just wanted to use up the dyes, which were mostly primaries in the three color families Carol Soderlund teaches in her beginning dye class.  Here's an overview of a lot of what I ended up with.


Then some blues, and a color parfait using two yellows on the first two fabrics, and a blue on top.  I do love my greens!!

 The blue with red on the left looks much better in person than it does in the photo.  I was glad to get a red that wasn't fuschia!


These are going to be overdyed- the two on the left have already spent the night in a bucket of turquoise dye.


I also fanfolded three pieces of fabric and put them in the same tray container.  Each piece got a different blue on it, then I flooded the bottom with fuschia.  I liked what happened.

I like the texture I got on these, and think I will be doing more fan-folding and less scrunching in the future.  I already have lots of yardage with the scrunch texture.

My hands-down favorites are these two spirals.

The one on the right was originally more lime green with purple, but I got impatient and rinsed and washed it before the turquoise dye had been on the cloth for 24 hours.  So, it turned out to be more acid yellow, and a lesson in patience for me.  

I was successful in using up most of the dyes in the frig, I only have a bit of a couple of colors left.  I've got a length of cotton knit soaking in one bucket now, waiting to be washed out, and the two that have been overdyed in turquoise.  I still have to figure out what I'm doing with the other one, that turned into insipid yellow and puke green.

All in all, a very good weekend in the dyepots!

Monday, June 18, 2012

Lunch with Del!

Del and I have been cyber-friends for a few years.  I enjoy reading her blog, and her photos of southern Cal, most of them only a few miles from where I spent my teen years.  I drool when she posts pictures from her sizable collection of art quilts from all over the world.  And I drool more when she posts about eating at southern Cal restaurants, especially my long-time favorite Rutabegorz!

So I was thrilled when she wrote me that she would be driving through Utah, and wondered if we could meet.  I was in Reno when she was heading north to Montana, but home when she was driving back home to Placentia.  So last Friday we met for lunch, and I had a wonderful time talking with her and enjoying a great lunch.

I thought and thought about where we could eat, and then my daughter reminded me about a place she took me to lunch once- La Jolla Groves.  Perfect!  We both had a salmon salad- a lovely moist filet on baby greens with a fruit salsa.  Yum and yum!  We split a piece of lemon cake- and I got a picture of both Del and the dessert.

Isn't that a fantastic Rayna Gillman scarf she's wearing?

It never ceases to amaze me how the internet has broadened our horizons.  I have been able to get to know people from all over the world, see artists' work that otherwise would not have been possible to see, and learn from some fantastic artists.  This was a simply delightful afternoon spent with another quilt lover and artist, made possible by the marvels of modern technology.  What could be better!

Monday, June 11, 2012

Ice Dyeing

After reading the article about ice dyeing in the current issue of Quilting Arts, I decided to give it a quick try this past weekend.  It helped that I didn't have to worry about mixing any dye solutions since you use the dye powder dry, and that I have some colors that were gifted to me several years ago.  I wanted to use mostly mixed colors, because I've read from multiple dyers that mixed colors split in interesting ways when used for snow dyeing.  And, ice dyeing can't be that different from snow dyeing, can it?

So I ended up with two containers, with four fat quarters in each.  One container I left downstairs in the studio for 24 hours; the other I set outside in the sun all afternoon, then brought it inside.


Looks like interesting dye soup, doesn't it?  The one on the left has Pro Bright Blue on the bottom, then Pro Pewter, Pro Lemon Yellow, and finally Dharma's Chinese Red on top.  The container on the right has Dharma Fire Red on the bottom, then Pro Gold Yellow, Dharma Rust Brown, and finally Sabrecon Yellow F-11 on top.  That yellow looks nice and bright, doesn't it?

Twenty four hours later I washed them out.  Here's the container on the right after washing and ironing.


The bottom fabric (Fire Red) is on the upper left, then they go clockwise to the top yellow fabric on the bottom left.  Not much yellow on that bottom fabric, is there?  That one will definitely be getting overdyed.  I like the Fire Red, even with all the white; the others, I'm not sure yet.

Here's the other container-


The bottom Bright Blue fabric is on the upper left, then follow them clockwise to the Chinese Red on the bottom left.  I like the blue, and the reds have possibilities.  Who would have thought this fabric would come from pewter gray dye?


My jury is still out on ice and snow dyeing.  The top fabric especially doesn't seem to get as much color with this method.  Sometimes the patterning looks pretty unique, other times it doesn't look any different than I get with regular LWI dyeing.  I suspect I'll be willing to play with it as long as I have old, mixed dyes that I wouldn't use otherwise, but I'm probably not willing to experiment with my single shade primary dye colors.

I just thought- maybe I'll try these parfaits again, only using Ann Johnston's parfait method that I've done before.  Could be really interesting to see how different (or the same!) they are.

I don't know if it was because of the dye colors or the temperature, but the container that spent the afternoon in the sun seemed to have more intense color.  It would make sense to me that the temperature would have something to do with it, since it would be much more likely to reach the optimal temperature for MX dyes.

This was a fun experiment, and one way or another, I'm sure I'll find a way to use these fabrics.  Now I need to decide what colors I want to dye this summer to replenish my stash.  I can see a few dye weekends in my future!

Sunday, June 10, 2012

Two weeks

have come and gone since I last posted.  I spent the first week camping in the eastern Sierras of California with my brother, and the second at work recuperating from the first week.  Photos?  I have enough photos from the trip to write months of blog entries.  Really.

That was one of the 'goals' of the trip- get familiar with shooting in RAW format, and learning how to edit those.  I also got to play with some lenses for macro shots, and get more comfortable with my tripod.  I'm at the beginning of the learning curve with editing photos from RAW- but hey, I have 900+ photos to practice on.

We camped at Robinson Creek, near Bridgeport.  My parents took us camping here when we were young, so my memories of the place go back many years.  My sister and husband, brother, me and my kids all came back here in 1990 for the Fourth of July celebration.  Bridgeport may be a small town, but they are serious about that holiday.  We had a blast, including my then twelve-year old son who got to play mud volleyball with his uncles and their friends.  I thoroughly enjoyed visiting the area I hadn't seen since then.


Most of the campground held trailers and RV's- we were one of only a couple of tent campers.  And yes, one morning we had steak and French fries for breakfast!!

I have lots of shots of wildlife- some not so good, some I am really pleased with.  This chipmunk and Stellar jay spent an afternoon paying us visits.  Yes, I tempted them with sunflower seeds and almonds.


This little guy got brave enough to check out my fanny pack with some trail mix in it- after I was dumb enough to leave it on the ground!


But the shots I'm happiest with were taken the morning we hiked along the creek with our cameras and tripods.  I was on a trail cut into a slope that goes down to the creek.  That meant I was at eye level mid-way up some trees growing along the side of the creek.  I first saw a gray squirrel on the trail, and stopped cold.  He got curious, jumped from the ground up to the tree, and kept getting closer to me while I shot away with the camera.


We went hiking, drove lots of dirt roads, and visited a ghost town not to far from Bridgeport.  It was a wonderfully relaxing and fun week with beautiful weather, gorgeous scenery, and good company.  I'll have lots more pictures to share as I get them edited.

Oh, and I had fun with some out-of-the ordinary shots- like, how about this closeup of our campfire one night!  I thought it made a cool abstract photo! 


Now I am off to iron out some ice dyes I did yesterday.  I'll have pictures of those later this week- hope yours is a creative one!

Tuesday, May 29, 2012

Tangled Textiles Reveal

Yesterday was the reveal for the latest Tangled Textiles challenge.  The theme was Green- so I was a happy camper, since I love the color.  And since it is spring, I chose to celebrate the color in nature.  I originally thought I'd use more limey greens with red violet, but the piece wanted to go a different direction- so here it is.

City Creek Walk, 2012

My processes and thoughts are on the Tangled Textile blog, and you can also look at what others in the group have done.  Here's a closeup look at the quilting and embroidery--


I had fun with this one.  The embroidery is from my own photos.  I'm hoping to come back from my trip to Reno and the Sierras with lots more photographic inspiration, and a much better understanding of my camera and how to use it.


Friday, May 25, 2012

Ugly Fabric

At least that is what Barbara, who sent fabric to a couple dozen dyers, said it was.  I'm sure some people got ugly fabric, but mine was not in that group.  The only 'rule' was that it had to be changed, and at least one layer had to be MX dyes.


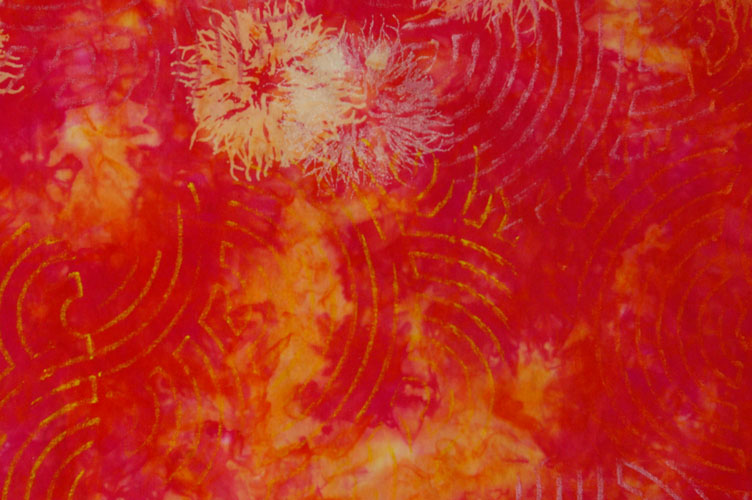
It was a lovely shade of orange with lots of yummy texture.  The color reminded me of a sunset, so I decided to stick with that idea.  First I overdyed it with Dharma's Light Red, scrunching it in a tray and pouring the dye down the sides of the tray so it only hit the bottom of the scrunched fabric.


This made it look even more like a sunset to me.  I wanted to do some discharge, so I used Soft Scrub with a thermofax screen I'd made from one of my photographs that I manipulated.  I made screens in three different sizes- I like being able to use the same imagery in different scales.  That Soft Scrub discharged FAST- I really had to move to keep it from taking too much color out.


I also used pearlescent white paint and metallic gold paint with the screens.  I tried to make those images subtle rather than 'in your face.'

After a few days of looking at the piece on my design wall, I decided to add one more element- Shiva paint stiks with a rubbing plate.  This plate is turning out to be one of my favorites, it is so versatile.  I used iridescent pink, orange, and light gold on this layer.


I'm happy with how this turned out.  Now I'll just have to figure out how to use it in a quilt!

Monday, May 21, 2012

More Moab (and a bit of a teaser!)

One of the side trips we took in Moab was to the Hole in the Rock.  It's a home that a couple literally carved out of a huge rock.  No photos allowed inside, but it was fascinating.  This is the official website for the place, and at least shows a photo of what it looks like from the outside.

What fascinated me was the unique sculptures they had on the grounds.  Most were life size or larger, made of bits of rusty metal.  Like this bull--

Neat, no?

I loved this golfer, who was taller than I am.

And if you can't tell what he's made from, here's a closeup of his hand--

Apropos, no??

This jeep looks like you could drive it away- until you give it a close look.


Those tires would provide a rather rough ride, I think!!


And lest you think that I've been doing nothing in the studio, here's a teaser of my Tangled Textiles piece, which I should have done by the end of the week.  I've got to have it posted before I leave for Reno Saturday!

This one took a different direction from what I'd originally planned, but I'm pleased with the results so far.  Reveal is this weekend!

Monday, May 14, 2012

Catching Up

I have not been very present on the blog.  I have not been spending as much time on the computer, because I have actually been spending it in the studio!  I've made good progress on my 'Green' piece for Tangled Textiles.  A good thing, because I have to finish it and get it posted before I leave for Reno on May 26.  Sorry, no pictures until the reveal!

And I still have lots of pictures I took at the Moab car show to post.  So here are some more- when it came to the cars, I was in to front grills and wheels.  I had fun with this!

  I played with this one in Elements- I think it has definite possibilites as an inspiration for a pieced quilt.  Love the green reflection on part of it!

 Wasn't there a poem about wearing red and purple together when you get old?  Maybe that's why I liked this one so much.

 I think this is on a rusty road rat.  Out of the ordinary, for sure!

 This was one classy car- I'd never seen a hood ornament with color before.

 Look at that combination of straight and curved lines!

I swear some of the paint jobs looked three dimensional. 

Look closely, and you can see me and my friend Phyllis in the reflection.  I think I could have fun with this one too!

I am off for the rest of the week, traveling for work.  Then one more week before I take off again for a week of camping in the Sierras with my brother.  I am so looking forward to relaxing, hiking, and picking his knowledge of photography and cameras.  And, I am looking forward to a relaxing train trip there and back- no airport hassles, no having to drive!

Saturday, May 05, 2012

Dessert Alert!

 
No quilt content here, but plenty of yummy dessert!   I've been wanting to make cake pops again, and a co-worker's talk about her love of caramel made me decide to try to make caramel cake pops.  I surfed the web again, and much to my delight found Stephanie of 52 Kitchen Adventures who also prefers her cake pop made from scratch, not with box mixes or canned frosting.  Her Salted Caramel Cake Pops sounded wonderful, so I used her recipe as a jumping off point.

My co-worker's talk about caramel also reminded me of something I'd done many years ago- making caramel by boiling a can of sweetened condensed milk in a water bath.  Stephanie made caramel from scratch, I decided I would try making it with the sweetened condensed milk.  I spent three hours watching carefully over the can of milk in the water bath, making sure the water never got below the can. I left it to cool until the next day.

Meanwhile, I made the Brown Sugar cake on Stephanie's recipe, only I did it in a 7 X 11 pan.

After getting some chores out of the way early this morning, I made my frosting.  

Simple- a stick of softened butter, about a cup or so of powdered sugar, vanilla, and about two-thirds of that can of caramel.  Yes, my boiled milk caramel turned out perfectly- that's it sitting next to my mixing bowl.  

Next, I crumbled up my cake.  This time I took the easy way and used my food processor.

Add the frosting- not all of it, just enough to hold the cake crumbs together, and throw it in the frig to get cold.  Once cold, I rolled it into cake balls, and popped it back into the frig to get cold again.

Stephanie dipped her cake balls in chocolate, but I didn't want anything to compete with the caramel.  So I used white chocolate, which is a lot more finicky when it comes to melting.  I learned that using a double boiler setup is the way to go, and also found that adding a bit of canola oil can help smooth it out.  Once I got them all dipped and sitting up on my styrofoam, they went into the freezer to get good and cold before I decorated them.

I used dark chocolate and the caramel sauce to decorate them, just drizzling it over the pops.

Here they are, partway through the decorating.

And here are all thirty, decorated and sprinkled with a bit of kosher salt. Having had one for dessert tonight, I can say for sure they are delicious!!