Showing posts with label Soap Club challenge. Show all posts

Friday, July 17, 2015

Oppositional!

To any of my fiber friends who still cruise by here wondering what has happened to me- yes, this is another soaping post.  However- don't despair- I have actually been doing a fair amount of fiber work the past month or so- I just haven't gotten around to posting it.  And, it will not be too long before all the soaping stuff will be migrated to another site.  Bear with me!

I entered another Soap Challenge Club in July.  This time we were to create a soap depicting opposites.  It could be color opposites, or opposite 'things' like night and day, or thick and thin.  I chose to work with color opposites- violet and yellow, to be specific.

And I'm posting this not because I believe my soaps are worthy of any kind of recognition, but more as part of my ongoing learning experience with soap making.  

I thought long and hard about what I wanted to do.  I knew I had to use a vertical divider, so that eliminated some design ideas I had.  I toyed around with using two vertical dividers, but ultimately decided to stick with one.  I've never used a vertical divider before, and I figured that getting three colors of soap in without some kind of mishap would be more of a challenge than I wanted to undertake.  I finally decided I wanted my two sections to be violet and yellow, with the added design element of a 'Holly swirl', or an in-the-pot drop swirl in each side.  I'd use white for the base color of the swirl, with the yellow and violet for the accent colors.

So, I got my mold ready with my home-made cardboard divider. . . 


I made my batter and divided out the colors, and added my scents- pomegranate fragrance oil in the violet, champagne fragrance oil in the yellow.  


I then poured two two complementary colors into the mold.


Once they were in, I removed the divider.  So far, so good!!

Then I worked on the in-th-pot swirl.  After mixing in titanium dioxide, I poured two spots of yellow, and two of violet.


I was happy, everything seemed to be staying fluid, and the colors dropped into the white soap.  I swirled the colors once with a skinny skewer.


Then I poured this into the violet and yellow soap, holding the cup high to help it break into the violet and yellow soap.  From what I could tell, it all seemed just fine.  I scraped the last of the soap onto the top, and decided to leave it as it was- a Jackson Pollack top!

I had high hopes when I cut the soap the next day.  Alas, it was not to be!!


These three bars had a nice swirl on the violent side, but the swirl barely broke the top on the yellow side.  The other bars had a tiny swirl close to the top on both sides.


I like the top, and the swirl on the violet side on these bars looks pretty much as I'd hoped it would.  Why the swirl didn't drop lower is a mystery, one that I will be trying to solve with future batches.

Thursday, May 14, 2015

Dessert, Anyone?


I have salted caramel cake pops, cherry trifle, tiramisu brownie bites, and lemon filled Pavlovas, garnished with a mint leaf.  Yum!

However, I won't be taking a bite out of any of these- they are all soap!  I made them for the latest soap challenge, and it was quite the learning curve.  It was also lots of fun.  Unfortunately, I don't have many pictures of the process, because I had to move fast.  Here's what I do have.

I needed to make four different desserts for the challenge, but ended up with six different mini-desserts.  I wanted to make mini cupcakes, since I'm known as the cupcake queen in my family.  I'd also decided to make little lemon tarts.  I knew I'd need some melt and pour fruit, so I made some 'cherries' in my mini-round mold.

The first day, I made my soap batter which included half and half as my food ingredient, and divided it into three sections:


The pink batter went into my mini cupcake molds to make strawberry cupcakes.  I colored another section dark brown with cocoa powder, and put it into a small square mold for the brownie bites.  The third section I split again; part colored with just a wee bit of cocoa powder, and the other part white with titanium dioxide.  I used that to make the trifles, which were molded in votive candle glasses.  I also used some of the natural batter to make the crust for my lemon tarts in the heart shaped mold.  This is what I ended up with on the first day. . . 


On the second day, I made another batch of the same recipe.  I saved some out at a thin trace to dribble, then I blended the rest to a thicker trace, because I knew I would be piping with it.  I piped dollops on the trifle.  I layered the brownie bites with thick soap 'cream'.  I piped frosting on my strawberry cupcakes.  

I had enough soap left to pipe the Pavlovas- I wasn't real happy with how the tart crusts had turned out, so I wanted a backup plan.  And, I had enough soap, so why not?


I also played with the soap fondant described in Cee's video.  I made strawberry halves with leaves.  I made mint leaves in a candy mold.  I made coffee beans to go on the brownie bites.  I found it easier to make the leaves by melting the fondant and pouring it into the leaf mold, refrigerate, and pop it out after it hardened.

Some of the tart crusts stayed fairly soft, so I decided to make cake pops with those.  I just rolled them into balls, stuck in a lollypop stick, and let them sit overnight.  

The next day, I made more melt and pour.  I colored some 'caramel' with copper mica and cocoa powder, and some I colored dark brown with cocoa powder.  I dunked the cake pops in the caramel melt and pour; once that had hardened, I drizzled the 'chocolate' melt and pour over it.  I also added some coarse salt while the chocolate soap was soft. I also made some yellow melt and pour, and filled the two tart crusts and the Pavlovas.  Here are ALL my creations!


The cupcakes turned out fine, I just was not happy that the strawberries bled onto the white frosting.  I have no idea why- I used mica and oxide to color the melt and pour fondant that I used.  I loved the way my coffee beans turned out!


I also sprinkled these with cocoa powder after I drizzled the white 'cream' on the brownie bites.

I made two 400 gram batches of soap to create these. I have no idea how much melt and pour I used, but it was less than half a one pound brick.

This was a lot of work, but also a lot of fun.  I don't know that I'd be doing this very often- but it was a wonderful learning experience.  Many thanks to Amy and Cee for this challenge!


Wednesday, April 15, 2015

Soap Challenge: Spinning Swirls (or, A Tale of Two Soaps)

First- yes, I have been absent from the blog for some time.  That is a story for another post, however.

 I wasn't able to participate in the last two soap challenges- too much other activity on the home front.  I was able to get to this one, however- in fact, I made two batches!

The challenge was spinning swirls, something I had never seen before, but it looked like fun- and very doable.  Marly (DIL) had been asking for a citrus scented soap, so that helped determine my colors.  My one big problem was my lack of a slab mold.  I did manage to cobble one together with some heavy duty corrugated cardboard I cut out of a box.

I needed my slow tracing recipe- I was going for three colors plus white.

,
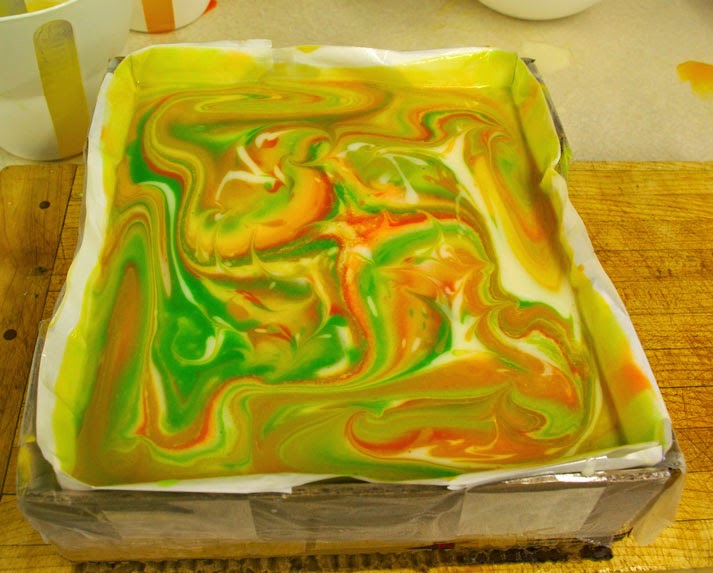
I wanted citrus colors, so I used Apple Green, Sunshine Yellow, Vibrance Orange, and titanium dioxide all from Nurture Soap Supply.  I love their micas!!

Here it is, all poured into my improvised slab mold.  As you can see, I don't have the best control with my pitchers.  Oh, well.


 Spun once. . .


Spun twice.  I liked the movement I got, but the colors blended more around the edges than I wanted.


However, when I cut the bars, I was surprised- that blending did not extend all the way through the soap.  So, here is my entry for the challenge!


I scented these with a combination of lime, lemongrass, and litsea cubeba essential oils.  They smell like citrus heaven!

I had time, so I wanted to test a theory- would using squeeze bottles give me better control of my pouring with a technique like this?  I also wanted a more permanent slab mold- cardboard was good for one batch, but not more!  So, my son and I spent a couple of hours making two molds- one small, one larger.  

I made the same recipe, using the same colors and scents.  I wondered if a slightly thicker trace would help with the color blending, so I got the batter to just a hair beyond emulsified, then poured into my bottles which already had the colorant in them.  I definitely felt I had more control over the pour.  No white blobs over my circles!


Two spins later, and we had. . . 


And here are the finished bars--


There is nothing wrong with them, they look good- but the narrower color bands I got on the first batch had lots more movement.  Maybe next time I won't blend past emulsification, and see what happens.  

My daughter-in-law now has plenty of citrus scented soaps to look forward to, and I now have two slab molds!

Thanks for hosting this challenge, Amy.  I love this technique and will be using it again!

Wednesday, January 21, 2015

Soap Challenge: Butterfly Swirl

I knew from the outset I would not make more than one attempt to get this one. I've not done a lot of hanger swirls, although I like the look.  Zahida of Handmade in Florida has done some amazing soaps using the hanger.

I also wanted to try something different for me- using a color for a background rather than white.  I decided to go with a gold background, and white, black, and deep red for the swirls.

I don't have a lot of process pictures, since I was both soap maker and photographer this time.  No way I was going to risk stopping the process and having the batter go thick on me!  I used one of my recipes that has proven to be a slow mover in the past- coconut oil, olive oil, shea butter, avocado oil, sunflower oil, and castor oil.  I scented it with Brambleberry's Champagne fragrance oil- love how that smells!

Here's my batter, divided out.  I used a bit of yellow oxide and a lot of Shimmer Gold mica (from Nurture Soap Supplies) for the main batter.  I used activated charcoal, TD, and Brambleberry's Merlot Sparkle mica for the accent colors.


I poured about half the gold batter in my mold, then drop swirled the colors, trying to stay on one side.  After all the batter was in the mold, I did some swirls on the top.

So far, the colors look good, just what I was hoping for. We'll see how they look in 24 hours. . . 

I realized the next day that I'd forgotten my sodium lactate, so the loaf was soft.  This one will need a nice long cure.  However, after 36 hours, I couldn't wait any longer, so I VERY carefully unmolded the soap.


So far, so good- but I want to see the inside!  So I made one cut- it looks good, I think I may get some butterflies!!

I waited another twelve hours before cutting the entire loaf.  I played around with different combinations, and decided this is the one that was most successful.  (The differences in the colors are because I used two different cameras- the top pics are from my iPhone, the last is with my Pentax DSLR.  The last photo is the most accurate color representation.)


To say I am thrilled would be an understatement!  Thanks to Amy Warden of Great Cakes Soapworks for hosting the challenge!


Thursday, December 11, 2014

Third Time's the Charm- Spoon Swirl with the Soap Club Challenge


Artic Waters, by Beverly Hart

I made a third batch of soap Sunday morning, hoping to finally get it all right and end up with a bar of soap I'd be happy to enter in the challenge.

My first decision was to use a different recipe- I wanted one that I knew would get to a thicker trace.  I used a recipe I'd developed and used previously- one that definitely thickened more quickly than the recipe I'd used in the previous two batches.

I got everything together- checking twice to make sure I didn't forget ANYTHING.  My son was kind enough to take pictures of the process, after I'd made the batter.

I added my colorants, using Blue Vibrance and Turquoise micas from Nurture Soap Supplies, and titanium dioxide in the main batter.  I also added kaolin clay for whiteness, and a combination of Fresh and Clean fragrance oil and peppermint essential oil.


I poured most of my main white batter into the mold.  It's already at a medium trace, should be great for a spoon swirl.


Then I started pouring the colors in.  One of the disadvantages of a heavier trace is that the colors are more apt to sit on top, rather than drop to the bottom of the soap.  Even pouring from higher up didn't change that much.


Time to get busy with the spoon.  I was definitely dealing with a thicker batter than in the previous two tries.


And, since this was a spoon swirl challenge, I decided to texture the top with the spoon rather than do swirls with my skewer.  I like the way it turned out.


I did not cover or insulate this- since I was using a wood mold instead of silicone, I did not want to take a chance on glycerin rivers.  I waited until late Monday afternoon to unmold and cut.  Here's the other side of the bar.


One little air bubble, but I like the way the colors move and combine.

So, there you have it- the third time was the charm with this challenge.  I had fun with the process, and certainly learned along the journey!